This lesson teaches you to
- Respond to the Send Button
- Build an Intent
- Create the Second Activity
- Receive the Intent
- Display the Message
You should also read
After completing the previous lesson, you have an app that
shows an activity (a single screen) with a text field and a button. In this lesson, you’ll add some
code to MyActivity that
starts a new activity when the user clicks the Send button.
Respond to the Send Button
- In Android Studio, from the
res/layoutdirectory, edit theactivity_my.xmlfile. - To the
<Button>element, add theandroid:onClickattribute.res/layout/activity_my.xml
<Button
    android:layout_width="wrap_content"
    android:layout_height="wrap_content"
    android:text="@string/button_send"
    android:onClick="sendMessage" />
The
android:onClickattribute’s value,"sendMessage", is the name of a method in your activity that the system calls when the user clicks the button. - In the
java/com.mycompany.myfirstappdirectory, open theMyActivity.javafile. - Within the
MyActivityclass, add thesendMessage()method stub shown below.java/com.mycompany.myfirstapp/MyActivity.java
/** Called when the user clicks the Send button */
public void sendMessage(View view) {
    // Do something in response to button
}
In order for the system to match this method to the method name given to
android:onClick, the signature must be exactly as shown. Specifically, the method must:
Next, you’ll fill in this method to read the contents of the text field and deliver that text to another activity.
Build an Intent
- In
MyActivity.java, inside thesendMessage()method, create anIntentto start an activity calledDisplayMessageActivitywith the following code:java/com.mycompany.myfirstapp/MyActivity.java
public void sendMessage(View view) {
  Intent intent = new Intent(this, DisplayMessageActivity.class);
}
Intents
An
Intentis an object that provides runtime binding between separate components (such as two activities). TheIntentrepresents an app’s "intent to do something." You can use intents for a wide variety of tasks, but most often they’re used to start another activity. For more information, see Intents and Intent Filters.Note: The reference to
DisplayMessageActivitywill raise an error if you’re using an IDE such as Android Studio because the class doesn’t exist yet. Ignore the error for now; you’ll create the class soon.The constructor used here takes two parameters:
- A
Contextas its first parameter (thisis used because theActivityclass is a subclass ofContext) - The
Classof the app component to which the system should deliver theIntent(in this case, the activity that should be started)
Android Studio indicates that you must import the
Intentclass. - A
- At the top of the file, import the
Intentclass:java/com.mycompany.myfirstapp/MyActivity.java
import android.content.Intent;
Tip: In Android Studio, press Alt + Enter (option + return on Mac) to import missing classes.
- Inside the
sendMessage()method, usefindViewById()to get theEditTextelement.java/com.mycompany.myfirstapp/MyActivity.java
public void sendMessage(View view) { Intent intent = new Intent(this, DisplayMessageActivity.class); EditText editText = (EditText) findViewById(R.id.edit_message); } - At the top of the file, import the
EditTextclass.In Android Studio, press Alt + Enter (option + return on Mac) to import missing classes.
- Assign the text to a local
messagevariable, and use theputExtra()method to add its text value to the intent.java/com.mycompany.myfirstapp/MyActivity.java
public void sendMessage(View view) {
  Intent intent = new Intent(this, DisplayMessageActivity.class);
  EditText editText = (EditText) findViewById(R.id.edit_message);
  String message = editText.getText().toString();
  intent.putExtra(EXTRA_MESSAGE, message);
}
An
Intentcan carry data types as key-value pairs called extras. TheputExtra()method takes the key name in the first parameter and the value in the second parameter. - At the top of the
MyActivityclass, add theEXTRA_MESSAGEdefinition as follows:java/com.mycompany.myfirstapp/MyActivity.java
public class MyActivity extends ActionBarActivity {
    public final static String EXTRA_MESSAGE = "com.mycompany.myfirstapp.MESSAGE";
    ...
}
For the next activity to query the extra data, you should define the key for your intent's extra using a public constant. It's generally a good practice to define keys for intent extras using your app's package name as a prefix. This ensures the keys are unique, in case your app interacts with other apps.
- In the
sendMessage()method, to finish the intent, call thestartActivity()method, passing it theIntentobject created in step 1.
With this new code, the complete sendMessage() method that's invoked by the Send
button now looks like this:
java/com.mycompany.myfirstapp/MyActivity.java
/** Called when the user clicks the Send button */
public void sendMessage(View view) {
    Intent intent = new Intent(this, DisplayMessageActivity.class);
    EditText editText = (EditText) findViewById(R.id.edit_message);
    String message = editText.getText().toString();
    intent.putExtra(EXTRA_MESSAGE, message);
    startActivity(intent);
}
The system receives this call and starts an instance of the Activity
specified by the Intent. Now you need to create the
DisplayMessageActivity class in order for this to work.
Create the Second Activity
All subclasses of Activity must implement the
onCreate() method. This method is where the activity receives
the intent with the message, then renders the message. Also, the
onCreate() method must define the activity
layout with the setContentView() method. This is where
the activity performs the initial setup of the activity components.
Create a new activity using Android Studio
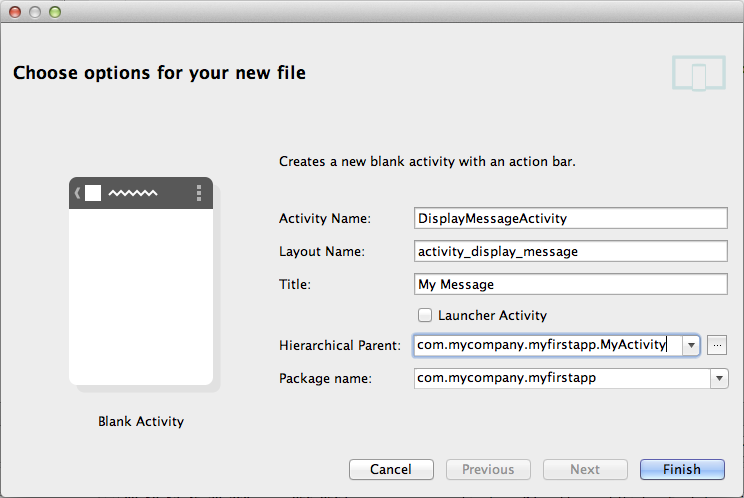
Figure 1. The new activity wizard in Android Studio.
Android Studio includes a stub for the
onCreate() method when you create a new activity.
- In Android Studio, in the
javadirectory, select the package, com.mycompany.myfirstapp, right-click, and select New > Activity > Blank Activity. - In the Choose options window, fill in the activity details:
- Activity Name: DisplayMessageActivity
- Layout Name: activity_display_message
- Title: My Message
- Hierarchical Parent: com.mycompany.myfirstapp.MyActivity
- Package name: com.mycompany.myfirstapp
Click Finish.
- Open the
DisplayMessageActivity.javafile.The class already includes an implementation of the required
onCreate()method. You will update the implementation of this method later. It also includes an implementation ofonOptionsItemSelected(), which handles the action bar's Up behavior. Keep these two methods as they are for now. - Remove the
onCreateOptionsMenu()method.You won't need it for this app.
If you're developing with Android Studio, you can run the app now, but not much happens. Clicking the Send button starts the second activity, but it uses a default "Hello world" layout provided by the template. You'll soon update the activity to instead display a custom text view.
Create the activity without Android Studio
If you're using a different IDE or the command line tools, do the following:
- Create a new file named
DisplayMessageActivity.javain the project'ssrc/directory, next to the originalMyActivity.javafile. - Add the following code to the file:
public class DisplayMessageActivity extends ActionBarActivity {

    @Override
    protected void onCreate(Bundle savedInstanceState) {
        super.onCreate(savedInstanceState);
        setContentView(R.layout.activity_display_message);

        if (savedInstanceState == null) {
            getSupportFragmentManager().beginTransaction()
                .add(R.id.container, new PlaceholderFragment()).commit();
        }
    }

    @Override
    public boolean onOptionsItemSelected(MenuItem item) {
        // Handle action bar item clicks here. The action bar will
        // automatically handle clicks on the Home/Up button, so long
        // as you specify a parent activity in AndroidManifest.xml.
        int id = item.getItemId();
        if (id == R.id.action_settings) {
            return true;
        }
        return super.onOptionsItemSelected(item);
    }

    /**
     * A placeholder fragment containing a simple view.
     */
    public static class PlaceholderFragment extends Fragment {

        public PlaceholderFragment() { }

        @Override
        public View onCreateView(LayoutInflater inflater, ViewGroup container,
                  Bundle savedInstanceState) {
              View rootView = inflater.inflate(R.layout.fragment_display_message,
                      container, false);
              return rootView;
        }
    }
}
Note: If you are using an IDE other than Android Studio, your project does not contain the
activity_display_messagelayout that's requested bysetContentView(). That's OK because you will update this method later and won't be using that layout. - To your
strings.xmlfile, add the new activity's title as follows:<resources> ... <string name="title_activity_display_message">My Message</string> </resources> - In your manifest file,
AndroidManifest.xml, within theApplicationelement, add the<activity>element for yourDisplayMessageActivityclass, as follows:<application ... > ... <activity android:name="com.mycompany.myfirstapp.DisplayMessageActivity" android:label="@string/title_activity_display_message" android:parentActivityName="com.mycompany.myfirstapp.MyActivity" > <meta-data android:name="android.support.PARENT_ACTIVITY" android:value="com.mycompany.myfirstapp.MyActivity" /> </activity> </application>
The android:parentActivityName attribute declares the name of this activity's parent activity
within the app's logical hierarchy. The system uses this value
to implement default navigation behaviors, such as Up navigation on
Android 4.1 (API level 16) and higher. You can provide the same navigation behaviors for
older versions of Android by using the
Support Library and adding
the <meta-data> element as shown here.
Note: Your Android SDK should already include the latest Android Support Library, which you installed during the Adding SDK Packages step. When using the templates in Android Studio, the Support Library is automatically added to your app project (you can see the library's JAR file listed under Android Dependencies). If you're not using Android Studio, you need to manually add the library to your project—follow the guide for setting up the Support Library then return here.
If you're using a different IDE than Android Studio, don't worry that the app won't yet compile. You'll soon update the activity to display a custom text view.
Receive the Intent
Every Activity is invoked by an Intent, regardless of
how the user navigated there. You can get the Intent that started your
activity by calling getIntent() and retrieve the data contained
within the intent.
- In the
java/com.mycompany.myfirstappdirectory, edit theDisplayMessageActivity.javafile. - In the
onCreate()method, remove the following line:setContentView(R.layout.activity_display_message);
- Get the intent and assign it to a local variable.
Intent intent = getIntent();
- At the top of the file, import the
Intentclass.In Android Studio, press Alt + Enter (option + return on Mac) to import missing classes.
- Extract the message delivered by
MyActivitywith thegetStringExtra()method.String message = intent.getStringExtra(MyActivity.EXTRA_MESSAGE);
Display the Message
- In the
onCreate()method, create aTextViewobject.TextView textView = new TextView(this);
- Set the text size and message with
setText().textView.setTextSize(40); textView.setText(message);
- Then add the
TextViewas the root view of the activity’s layout by passing it tosetContentView().setContentView(textView);
- At the top of the file, import the
TextViewclass.In Android Studio, press Alt + Enter (option + return on Mac) to import missing classes.
The complete onCreate() method for DisplayMessageActivity now looks like this:
@Override
public void onCreate(Bundle savedInstanceState) {
super.onCreate(savedInstanceState);
// Get the message from the intent
Intent intent = getIntent();
String message = intent.getStringExtra(MyActivity.EXTRA_MESSAGE);
// Create the text view
TextView textView = new TextView(this);
textView.setTextSize(40);
textView.setText(message);
// Set the text view as the activity layout
setContentView(textView);
}
You can now run the app. When it opens, type a message in the text field, click Send, and the message appears on the second activity.
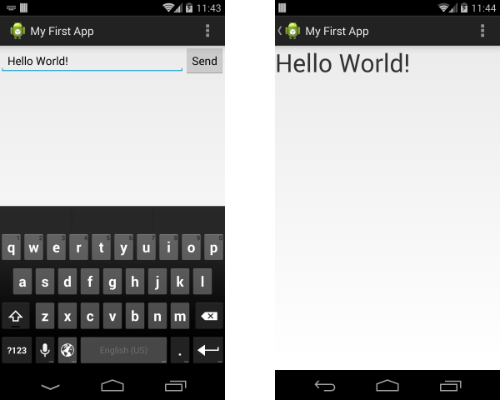
Figure 2. Both activities in the final app, running on Android 4.4.
That's it, you've built your first Android app!
To learn more, follow the link below to the next class.